This year I have set a goal to organize our family photos from over the years and ensure they are stored and backed up properly. We have photos stored on multiple devices including phones, laptops, memory cards, photo cds and on our desktop computer. I want to ensure all of our photos are organized in one place to make it easier to share with family and also to print and create more photo books. If I were to lose the photos I would be devastated so working on this project has become one of my main priorities this year.
Why is it so important you back up your photos?
I think we could all agree that our photos are one of the things we treasure the most and yet how careful are we at ensuring the photos on our phones and computers are stored safely and securely? We use our phones for photos on a daily basis and yet if our phones were lost or stolen or perhaps our child dropped it into the toilet the photos could be lost forever. The same thing goes with our computers, that could easily crash.

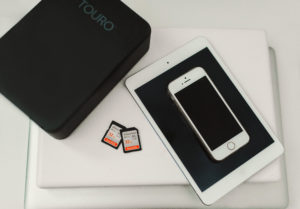
Step One: Gather (phones, tablets, laptops, memory cards, photo cds, etc)
In some ways this is the hardest part. I’m the type who takes a lot of shots on my phone, and I’m not great about deleting the bad ones as I go or dumping them off onto the computer. Also, people email or text me photos I want to keep but sometimes they just sit in my inbox. So, the first step to any kind of organization is to get it all in one place.
For me, this is my desktop computer. The task is to get all of my photos into my preferred spot for organizing. So, connect and download all your phone photos to your computer. Take out your memory cards from your cameras and make sure they are all uploaded to your computer. Upload photos from cds and transfer photos from old laptops. Don’t obsess over this. Just get as many as you can all in the same place. If you have too many files to upload and not enough space on your computer then I recommend doing one year at a time and start with the most recent.
Step Two: Organize
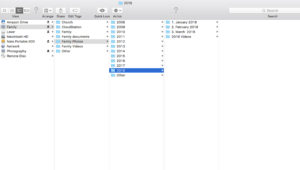
There are many ways to organize your photos. I do a combination of date and event. I create a folder for each year and within that year I have a folder for each month. Then from there I break it down to events within each month. That way when I go back and try and find photos I can narrow it down to the year/month and easily find the event I am searching for. This is how my brain works. You should organize how your brain works. So if you want to sort your photos by kid, or school year or major events, do that. There is not right or wrong way. Just figure out a system that works best for you.
Organize all of it. Don’t leave anything just floating out there. If there are random pictures that you don’t have time to sort or can’t remember which exact month they were taken then put them into a miscellaneous folder for that year and go back through them at a later date.
I also like to have a folder for each year that I store all of my video clips I have taken during the year. Eventually, I hope to go back and combine them and make a video for year each for our family.
Step three: Declutter
Delete duplicates and fuzzies. Unless they have extreme sentimental value to you, there is no reason to keep an out-of-focus or duplicate photo. Not only does it take up space on your computer but it will make it easier later to find the photos you want to print or add to your photo books.
Step four: Storage
Portable External Hard Drive
These are a relatively easy way of backing up your data and many are now both lightweight and small in size. I recommend buying a larger external hardrive then you think you will you so you have room to grow. If you can’t fit all of your photos on one external hard drive, try using one per year of photos or every few years.
You can purchase external hard drives online and at many local retailers. I have purchased Seagate external hard drives in the past from Costco and they have worked out great.
If you have a Mac, an external hard drive also makes it super easy to use the Time Machine automatic backup function. You simply plug it in via USB and the program does the rest.
Remember you shouldn’t soley depend on an external hard drive as your only source of backup as they can fail from time to time which is why I highly recommend having an online storage option as well.
Cloud Based Backup
There are dozens of these available now, some of them offering up to 50GB of free storage, others that you pay a monthly or yearly subscription for unlimited storage. Many have different features like backing up all data, not just photos, so it’s important to choose the correct service for you.
I use Amazon Prime for my online photo storage solution and it has worked great for me. If you have an Amazon Prime membership you get unlimited photo storage space at no additional cost. It also includes 5gb of video/file storage. You can purchase an additional 100gb of file/video storage for only $11.99/year.
To take advantage of Amazon Prime Storage go to: www.amazon.com/photos and click on the link to download the Amazon drive software. Then drag and drop your folders or select the option for all of the photos on your computer to automatically upload to the site. You can also add the Amazon Prime Photo app to your photo and upload your photos that we.
I have also used google storage that has worked great. For $1.99/month you receive 100gb of photo storage a year.
Backup regularly – Put a reminder on your calendar to do it monthly at minimum but weekly would be more ideal. This could vary depending on where you are and what you’re doing. However, if you have a big trip or family event I would recommend backing up right after the event. You can even setup your computer and online storage to backup automatically.
Whatever backup method you choose, it’s important to make sure you actually do it and get into a routine that suits you. I can tell you from personal experience, and you’ll know if it’s ever happened to you, that it’s devastating when you lose photos. After all, they form part of your memories.
Step 5: Create photos books and print your photos more easily now that your photos are organized and gathered all in one place. The reason we take photos is so that we can reflect back upon them later and enjoy them.
Tips on How to Organize and Backup Your Digital Photos


Show Hide 0 comments